sl scm-secrets
The scm-secrets command allows you to manage the client-side secrets
scanning feature.
Prerequisites
Ensure that you've followed the steps for setting up Qwiet AI by Harness on your local workstation first. No language-specific steps will have to be done, since the secrets-only analysis will not consider them.
Also ensure that you've set up a token for GitHub's
API and pass it via the
GITHUB_TOKEN environment variable:
export GITHUB_TOKEN=...
Configuration
There are several options to e.g. let users choose the organization to scan, or to set the API token for talking with the GitHub API.
| Option | Environment variable | Description |
|---|---|---|
--org <name> | GITHUB_ORG | Which GitHub organization to scan |
--github-token <token> | GITHUB_TOKEN | A token to use GitHub's API to e.g. list available repositories |
--github-api-base-url <URL> | GITHUB_API_BASE_URL | The base URL for your GitHub Enterprise server |
--github-api-force-insecure-tls | GITHUB_API_FORCE_INSECURE_TLS | If set, sl will accept any certificate presented by the server and any host name in that certificate |
Sensitive information like the API token should only be passed via environment variable.
Disabling TLS certificate checks should be avoided if possible.
Initial Setup
For the initial setup, typically done by members of the security team,
the discover subcommand will have to be used to ensure that all
repositories in your organization have corresponding projects created on
the Qwiet AI by Harness platform:
sl scm-secrets discover
(If necessary, the organization to scan may be specified with the
--org ... parameter.)
The full command also allows specifying the comma-separated list of repository names to use:
sl scm-secrets discover [--repositories ...] [--branch ...] [--page ...]
| Option | Description |
|---|---|
--repositories <names> | The repository names that will be scanned. If unset, all repositories of the organization will be queried to populate this list (except disabled and archived ones). |
--branch <name> | The branch that will be cloned. If unset, will be taken from GitHub's API, or either main or master will be used. |
--page <page> | Page to start at when listing organization repositories. Defaults to 1. |
While not necessary for normal operation, the --page option will let
users choose where to resume operation in case the setup was
interrupted. The command will print each page number whenever it
reaches a new page and this may then be entered for the next run.
The branch name will be taken from either the GitHub API, or, as a
fallback, will try to use master and main, presumably the most
likely options for the main branch of a repository.
Hook Setup
Subsequently and for each checkout of the repositories, developers will
then have to set up the Git pre-commit hook on their own machines in
order to prevent secrets from being checked in.
If already present, the user will be prompted to overwrite the existing file, or leave it as-is.
sl scm-secrets hooks setup
Running Hook
The Git pre-commit is implemented as another subcommand, however it
should normally not be necessary for users to run this command by hand.
It is instead being invoked from the .git/hooks/pre-commit file, see
also the previous section for how to set that one up.
sl scm-secrets hooks run [--app ...]
While normally the application name should be automatically detected, it is possible to override that mechanism with the following option:
| Option | Environment variable | Description |
|---|---|---|
--app | SHIFTLEFT_APP | The name of the application the analysis is for |
Usage
Once set up for every checkout of the repositories, every commit will be checked for secrets, that is, every checked-in file will be scanned, locally, for any matching well-known secrets pattern. If there are any, the commit will not be allowed and the user will have to remove them before attempting the operation again:
Found 2 secret(s) in checked-in files:

- Secret Keyword in src/main/resources/application.properties, line 1: "..."
- Secret Keyword in src/main/resources/config/application-aws.properties, line 2: "..."

Commit will be rejected till secret(s) have been removed.
got 2 secrets findings
This behaviour can be disabled by temporarily specifying -n /
--no-verify, or permanently by removing the hook file. See also the
Git documentation
on the topic, as well as the in-detail explanation for
githooks.
The hook itself can be invoked with sl scm-secrets hooks run in the
top-level folder of the repository.
Slack Notifications
Users can be notified of attempts to commit secrets to a local checkout of a repository via Slack messages.
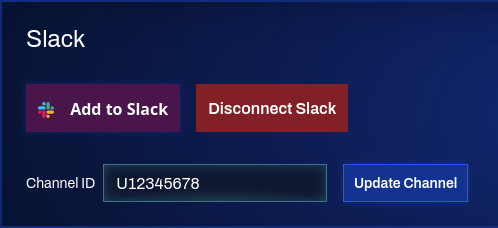
The organization settings page can be used to add the Qwiet Slack app to your Slack workspace. (This might require certain permissions only privileged accounts might have.)
Clicking "Add to Slack" will navigate to your Slack workspace and present a screen to let you decide, whether to grant the requested permissions for the Qwiet Slack app (and add it to the workspace if not already present), or cancel the action.

At the moment, the permissions the Qwiet Slack app will request are:
chat:writeim:write
Cancelling and allowing will both navigate back to the organization settings screen.
Once permissions have been granted, the authorizing user will be set as the recipient of any notifications (via direct messages).
At this point, the channel ID may then be changed via the same settings panel. Clicking "Update Channel" will set the channel to receive notifications for the whole organization.
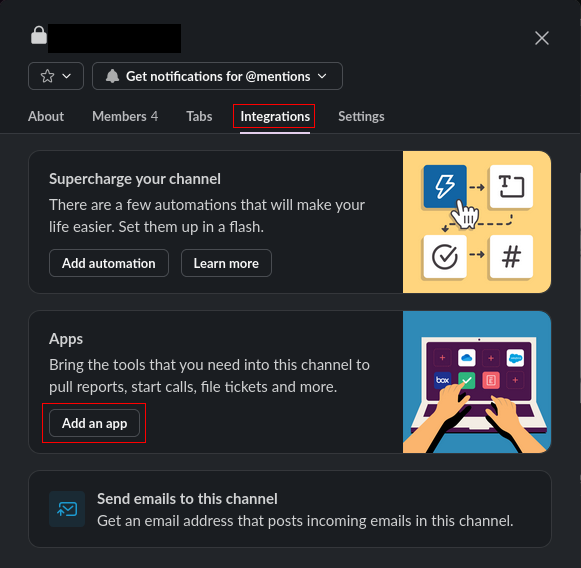
The app doesn't add itself to the set channel: Use the "Integrations" panel of a channel to add the app by hand.
The top of each channel has a little button with three dots, which will open up a settings panel.

In this panel, choose the "Integrations" tab and use "Add an app" to open up a selector for apps to add.
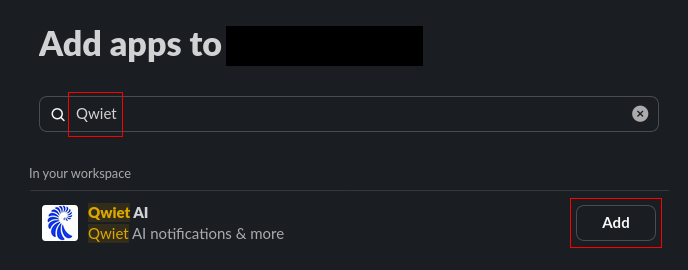
Enter "Qwiet", or "Qwiet AI", to find the Qwiet Slack app and use the "Add" button to add the app to the channel.
Once this is done, notifications can be sent to the channel by the app.
The Slack notifications may be disabled entirely by using the "Disconnect Slack" button. Note that this will remove the app from your workspace and will require you to perform the setup steps from above again.
Reporting
A report of the number of attempts to commit secrets can be obtained via API. For additional details, review the API documentation.