Findings
The findings tab of the application page allows you to see the findings discovered during Qwiet AI by Harness analyses. Currently, Qwiet AI by Harness identifies the following types of findings:
- SAST
- SCA
- Container findings
- Secrets
- Security issues
- OSS Risk (when enabled in Settings)
- AI Risk (when enabled in Settings)
For each finding on the list, Qwiet AI by Harness displays the following fields:
- Finding ID, such as
42 - Severity level, such as
Critical - Adjusted Severity, such as
High - Title, such as
SQL Injection: Attacker-controlled Data Used in SQL Query - Tags, such as
OWASP a1-injectionorCVSS 9 - Type, such as
VulnerabilityandSecret - Status, such as
Fixed - AI Confidence, such as
Confirmed Risk(Available when AI Confidence and Analysis is enabled in Settings) - Reachability, such as
Reachable,Unreachable, orN/A - Exploitability, such as
Exploitable,No Exploits, orN/A - App name, such as
shiftleft-java-demo - Team name, such as
Engineering - App groups, such as
Code Science
You can sort your list based on Finding ID, Severity, or Adjusted Severity level (ascending or descending).
Right above the sorting options, on the top-right corner, you can see whether or not there are new SCA results available. Qwiet AI by Harness continually checks your application and alerts you if there are new OSS vulnerabilities affecting your application. The timestamp displayed lets you know when the latest check for new OSS vulnerabilities was performed by Qwiet. If there are new results, you should rescan your application to populate the findings to the dashboard.
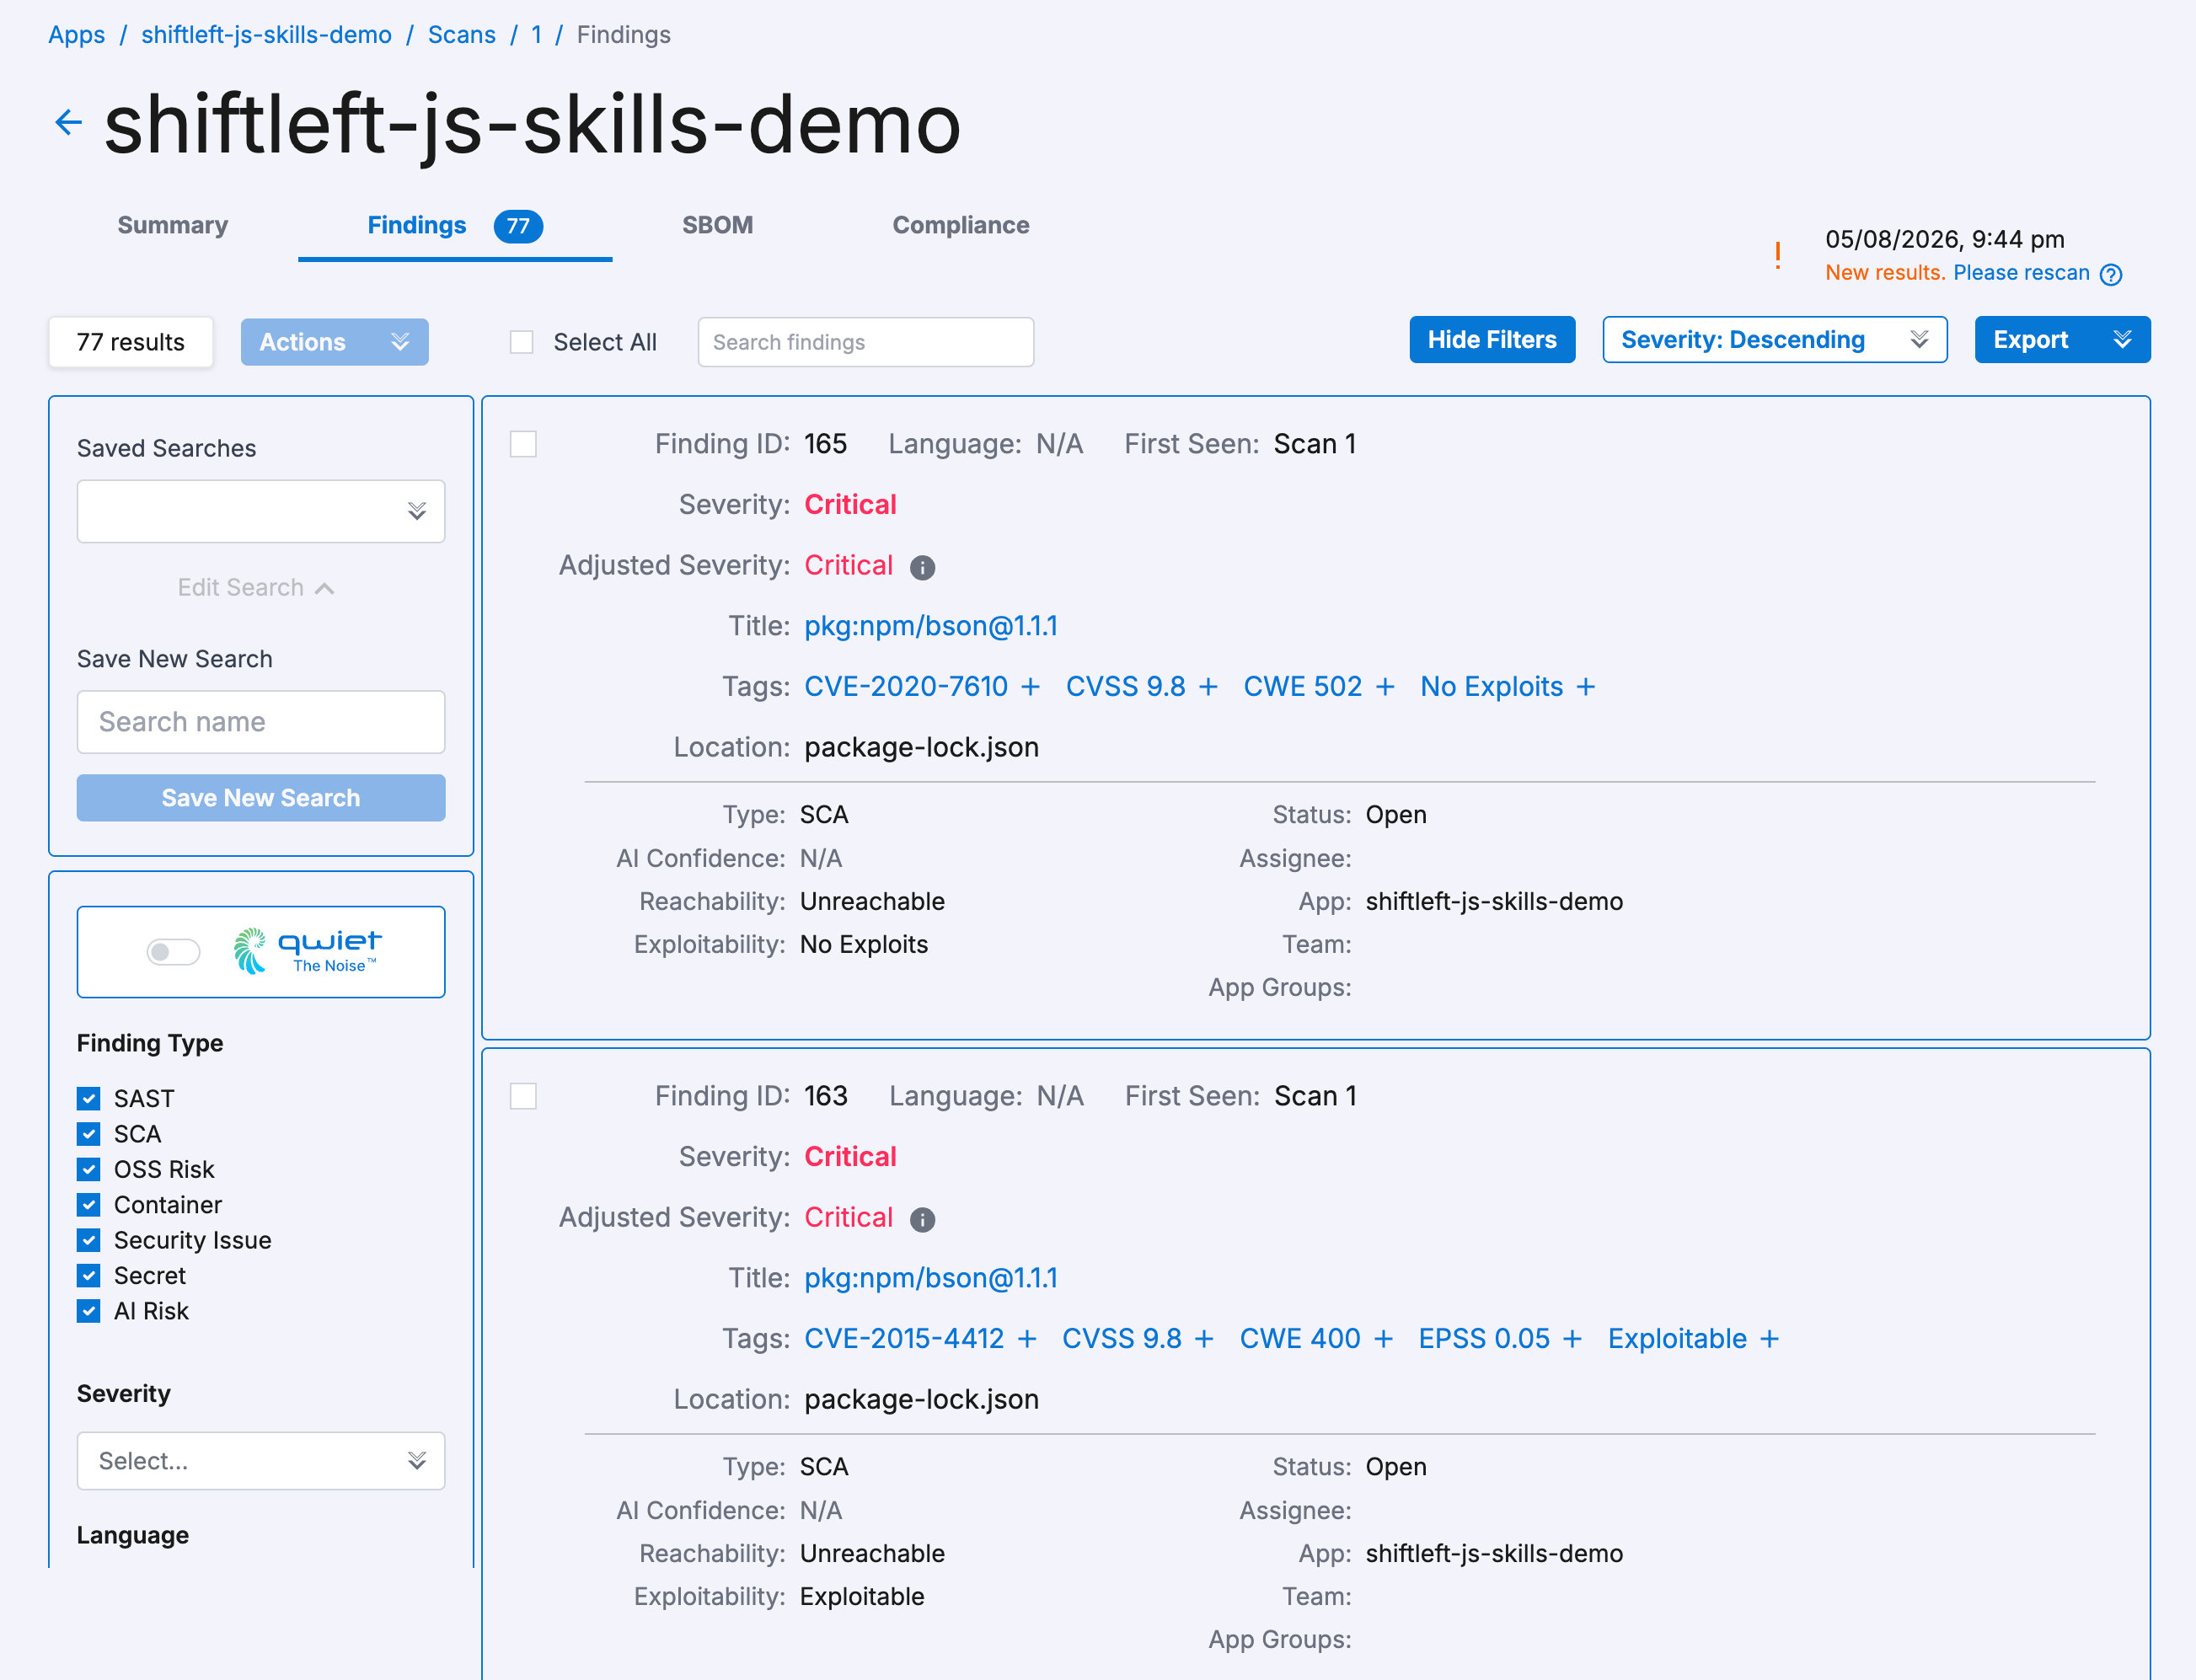
Qwiet the Noise
To help prioritize the review and fixing of findings, you can toggle on Qwiet the Noise, which filters for only Critical, High, Reachable (if applicable), Exploitable (if applicable), and AI Confidence (Confirmed Risk) findings.
Filtering findings
You can filter the findings list by the following criteria:
- Finding Type
- Language
- Severity
- Status
- Assigned To
- AutoFix
- AI Findings
- Exploitability
- Reachability
- AI Confidence
- OSS Risks
- CVSS Score
- EPSS Score
- Source Method
- Sink Method
- Sink User Method
- Package Url
- Package Component
- OWASP 2025 Category
- OWASP 2021 Category
- OWASP Category
- CWE Category
- CVSS Score
- CVE
- Category
- Adjusted Severity Overridden
- Adjusted Severity
The Saved Searches panel allows you to save and recall a set of filters. Each user can save up to 10 searches. Once a search is recalled, it can also be edited and deleted as needed.
To quickly remove all filters, click on the Findings tab title.
Viewing detailed finding information
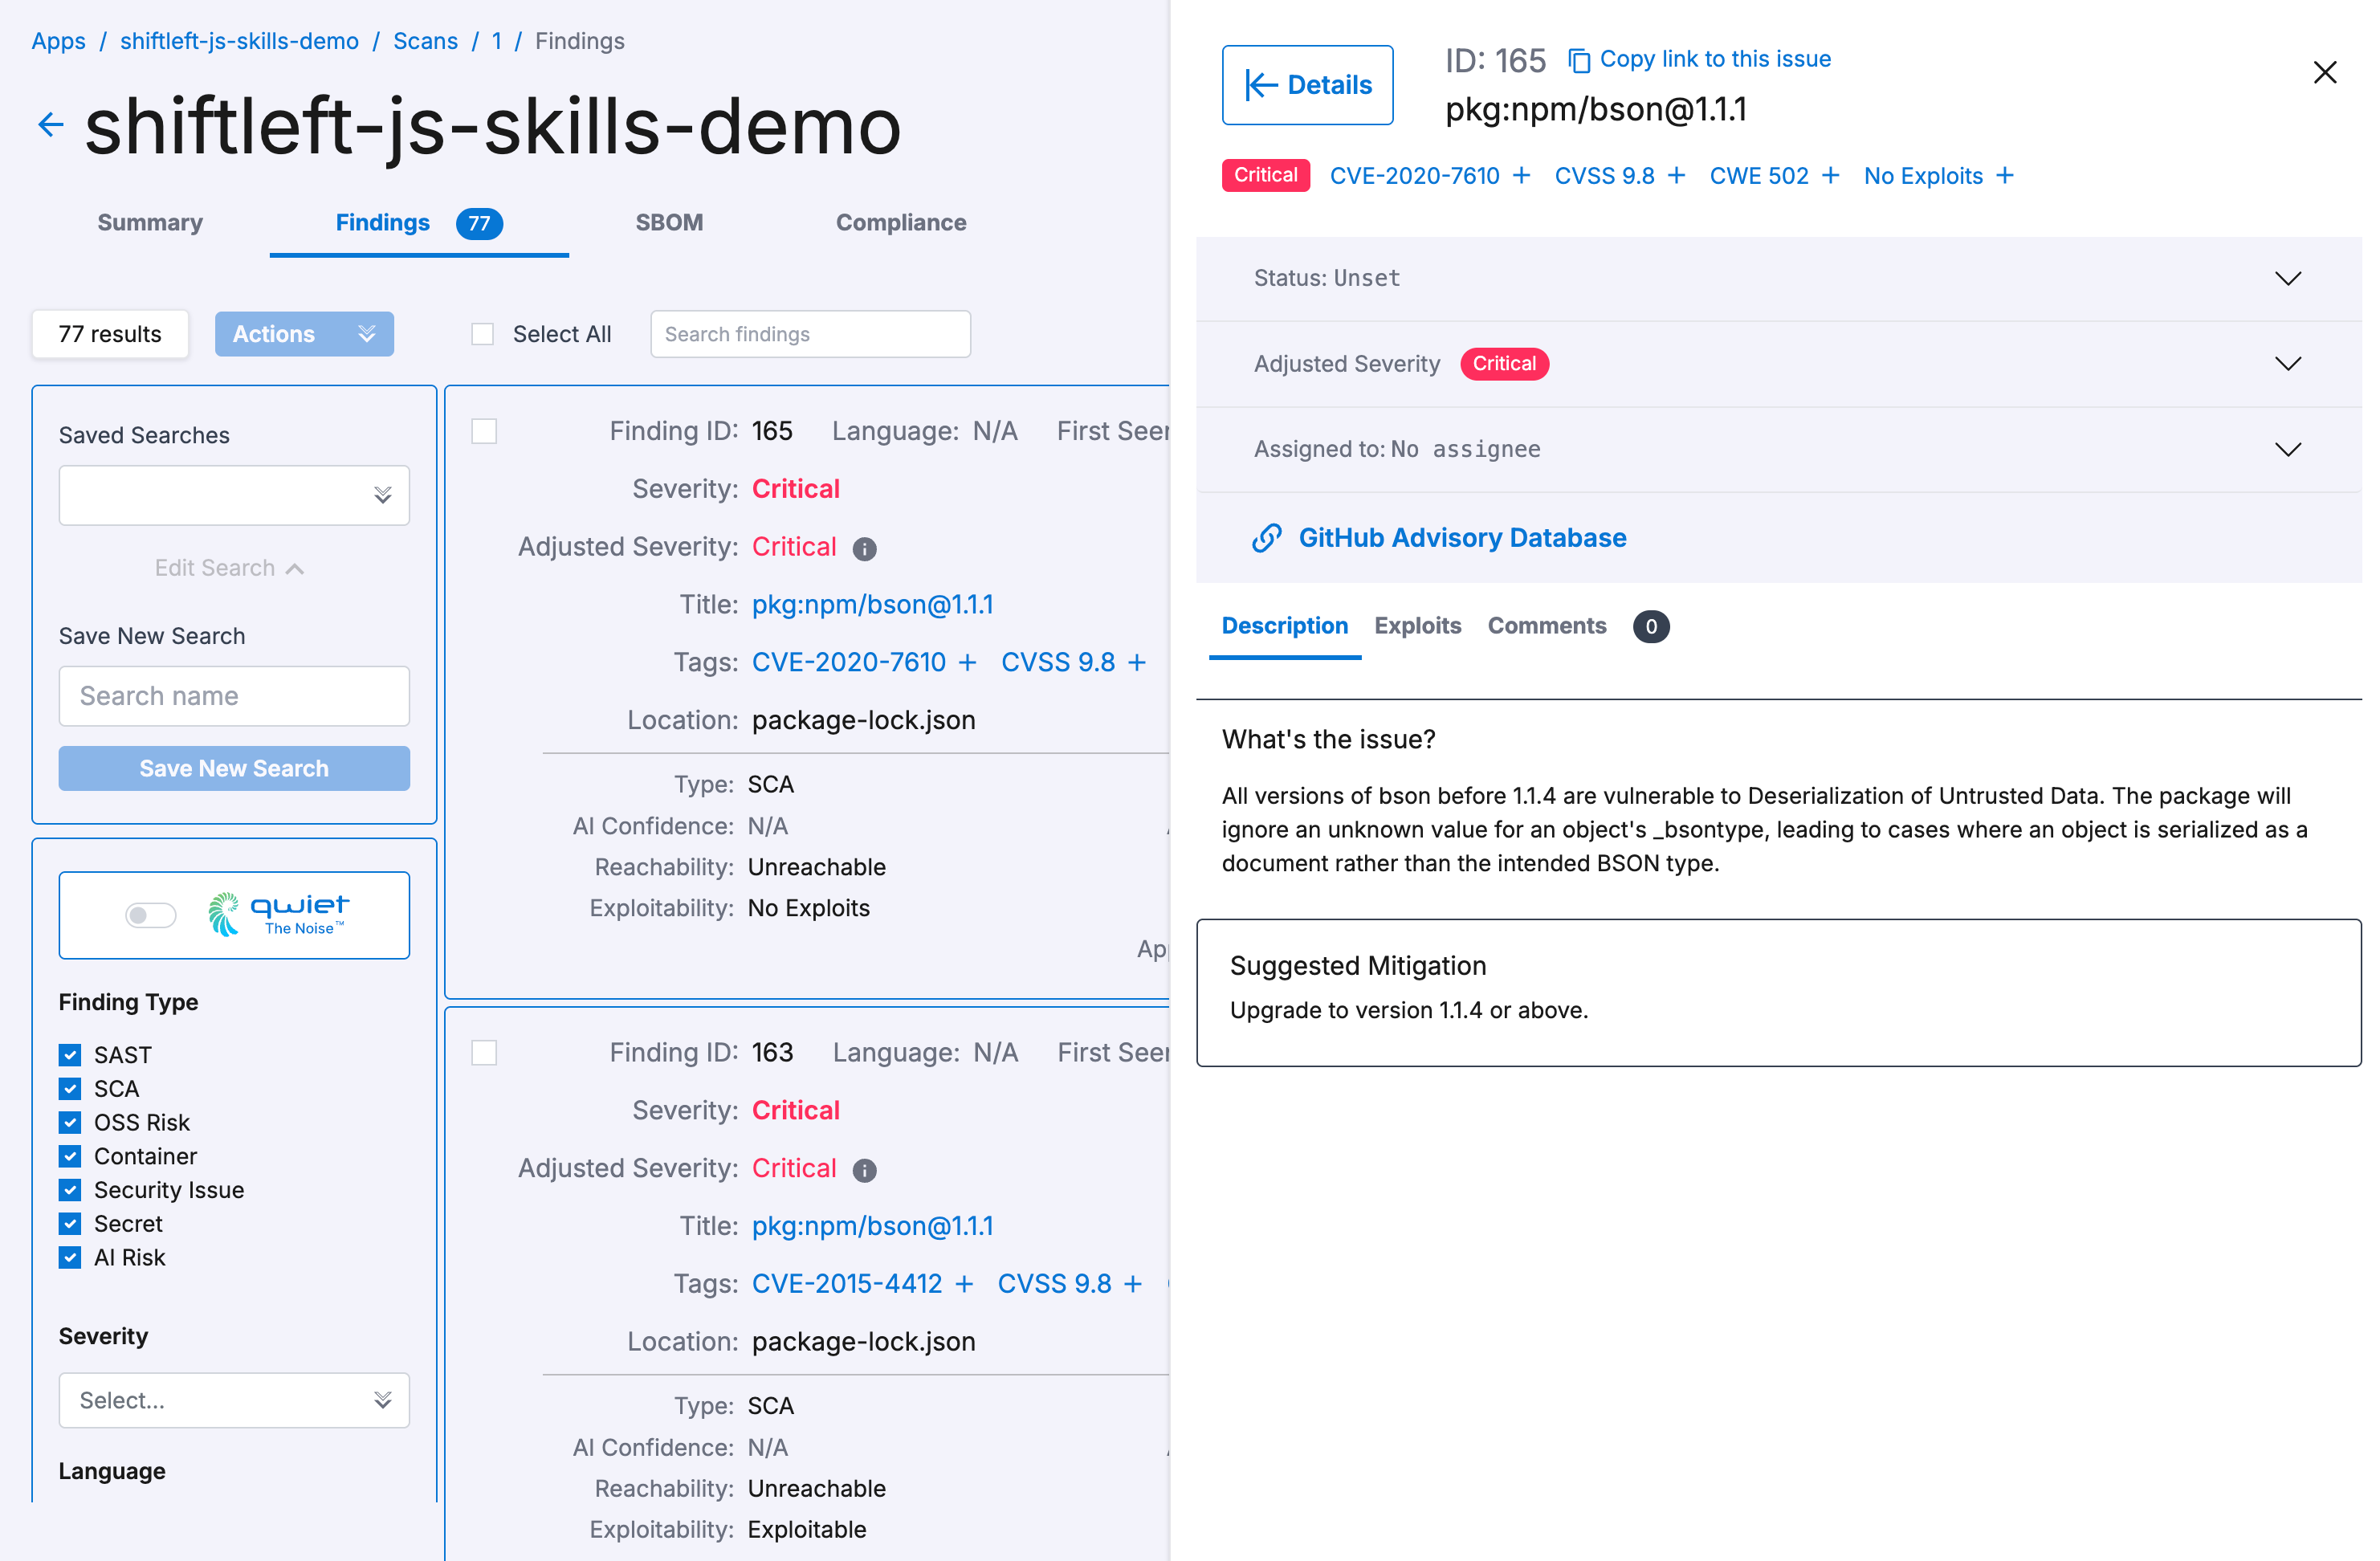
Clicking on a finding in your results list opens a slide-out window on the right with detailed information.
Some tabs are only available for some findings types, such as SAST, and only when certain capabilities are enabled, such as AutoFix.
-
Description: The Description tab features an in-depth write-up of what the issue is and why it is a problem, as well as mitigation suggestions for securing your app.
-
AutoFix: If enabled for your organization and application, the Auto Fix tab shows available AutoFix suggestions, AutoFix pull request link (if enabled and available), and additional information that you can use to address a SAST finding.
-
Data Flow (SAST findings only): The Data Flow tab shows you the path from the source (which is the portion of the code that "allows" a vulnerability to occur) to the sink (where the vulnerability happens).
-
Reachability (SCA findings only): The Reachability tab displays evidence that the vulnerable open source library function identified by the finding can actually be called, reached, or fed attacker-controlled data from your code. For more information, see the Understanding Reachability tab section below.
-
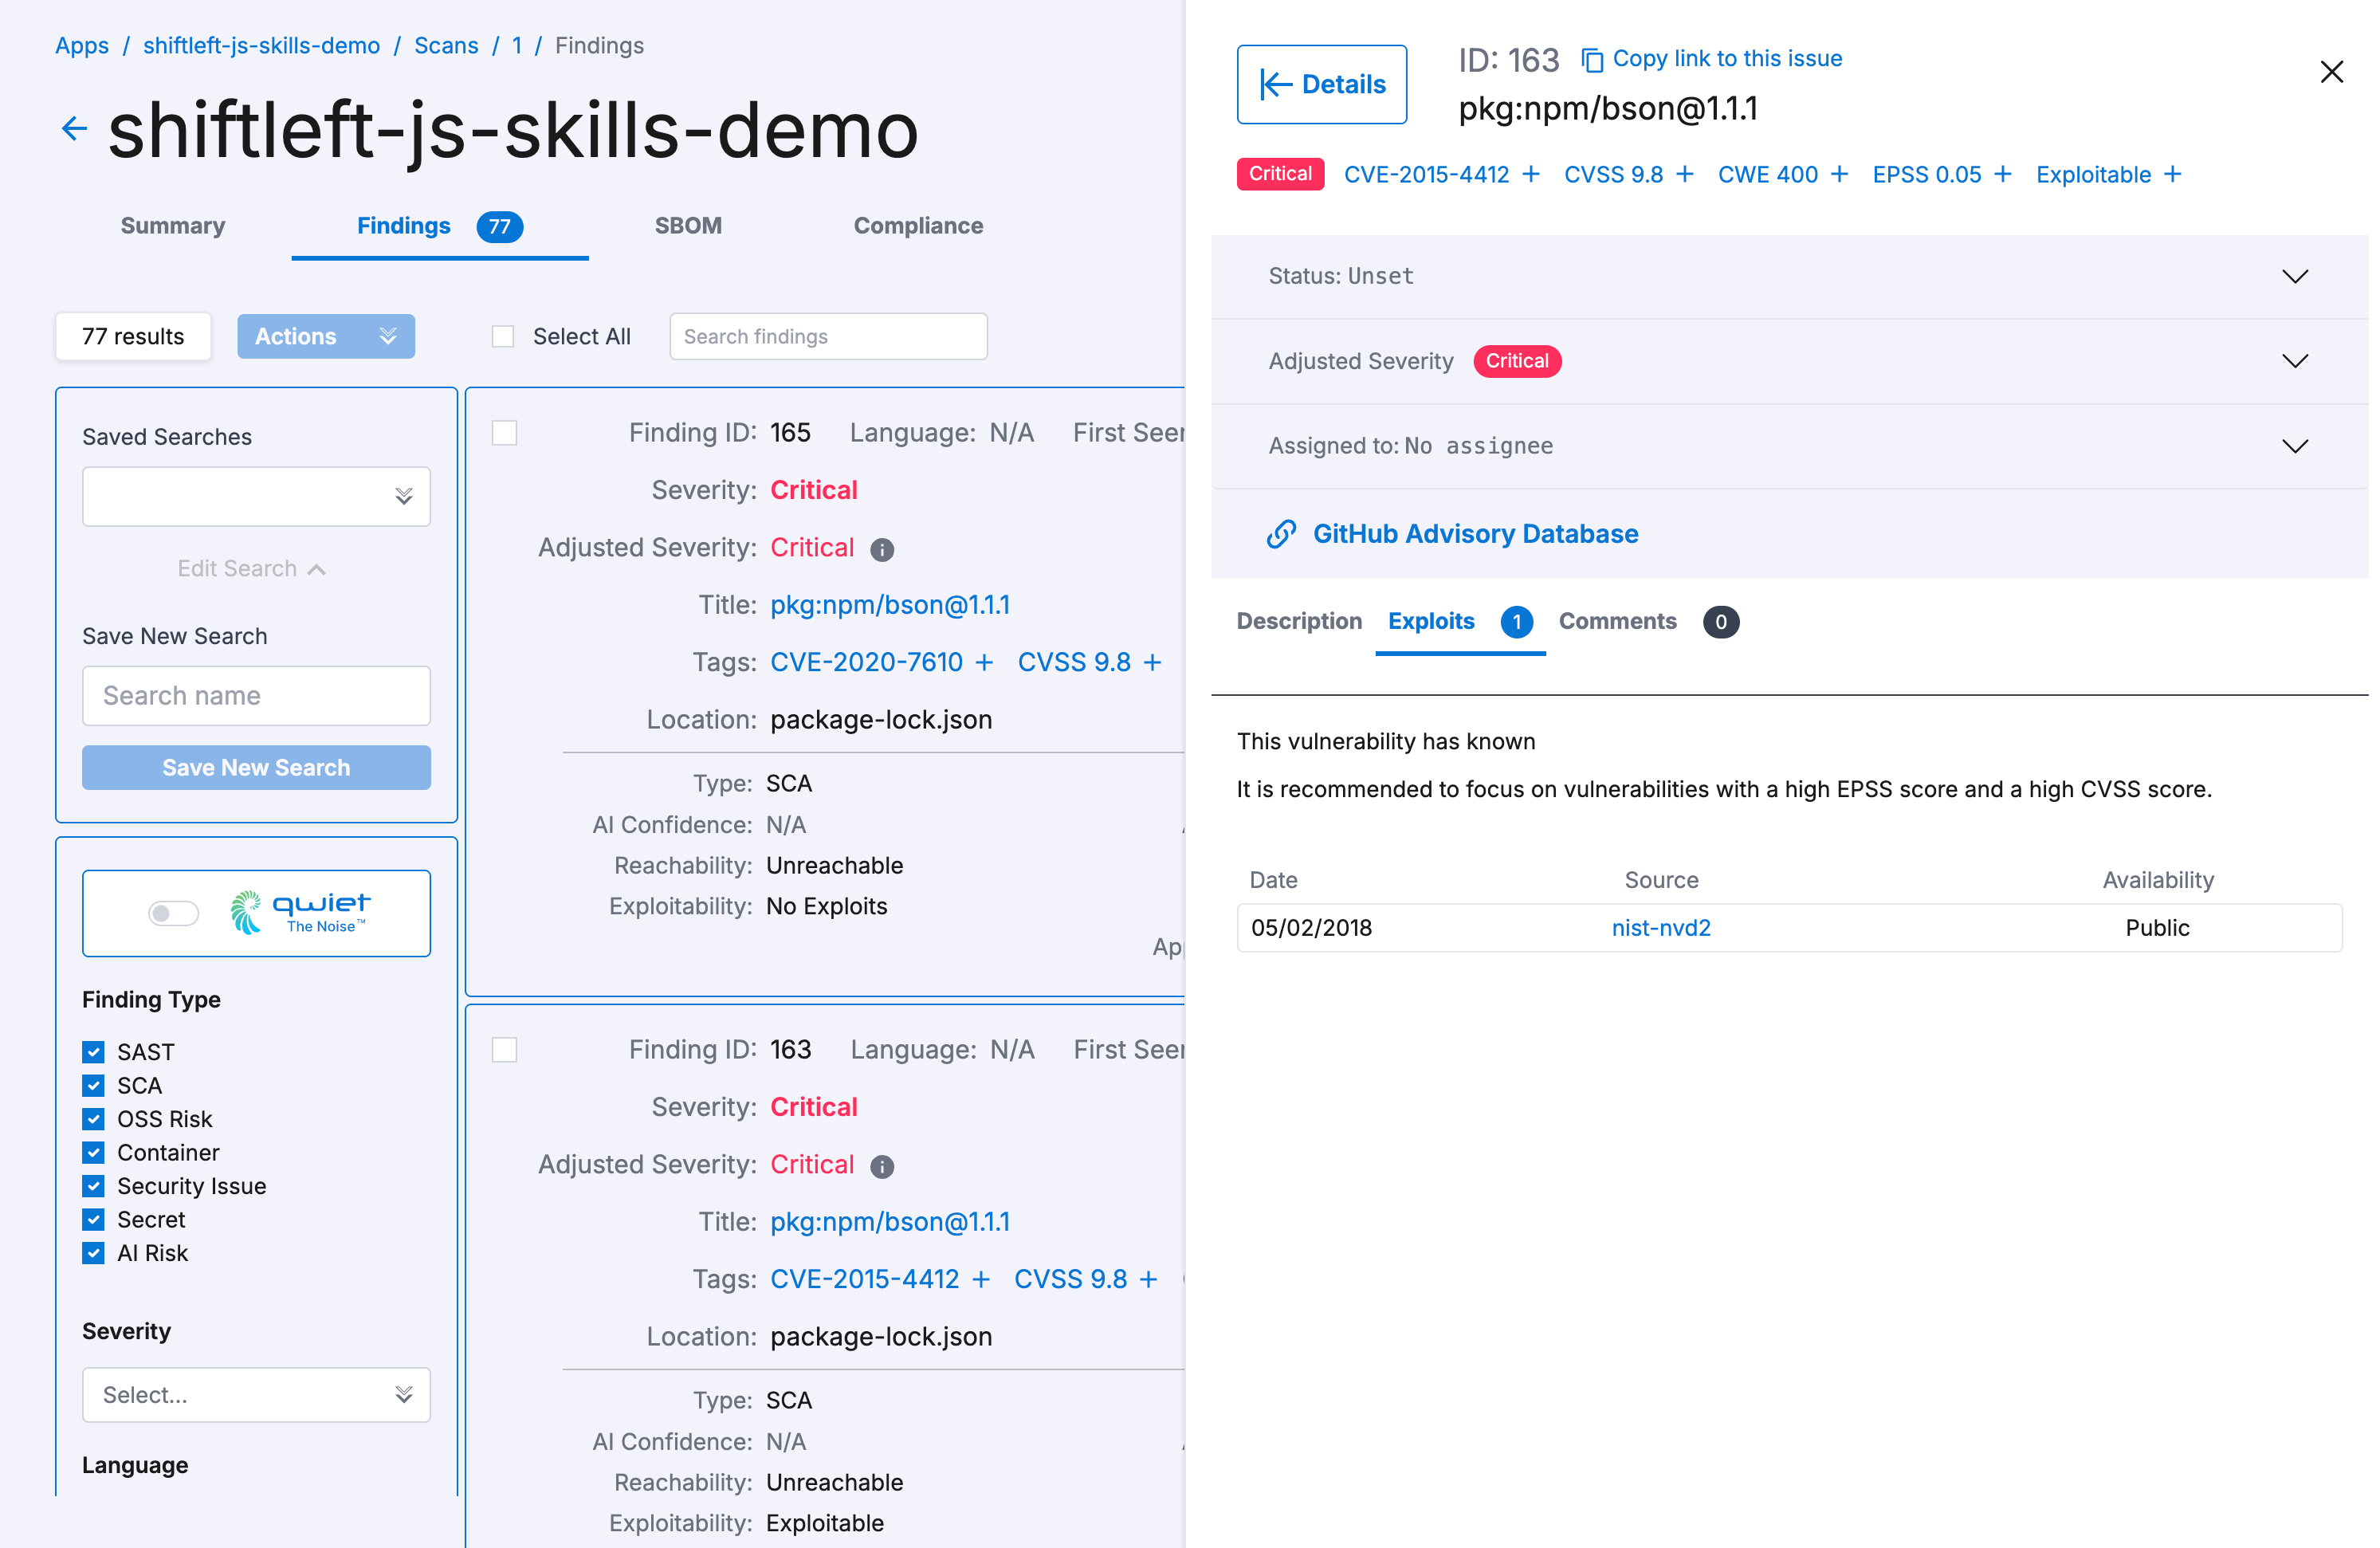
Exploits (Blacklight): The Exploits tab includes up-to-date exploitability information on the vulnerability, including the:
- Date reported
- The source providing a proof of concept of the exploit
- The availability of the exploit, such as public, private, or commercial
The Exploit Prediction Score System (EPSS) score shown for the vulnerability can help you determine the severity and priority of a given vulnerability. The EPSS score falls between 0 and 1, and we recommend focusing on findings with a high EPSS score and high CVSS score. The presence of a CISA KEV tag indicates that the vulnerability is part of the United States of America's Cybersecurity & Infrastructure Security Agency (CISA)'s Known Exploited Vulnerabilities Catalog (KEV). This can help you determine the importance of an OSS finding.
-
Comments: The Comments tab allows you and your team members to make notes specifically about this finding; if there are multiple comments for this finding, Qwiet displays them in reverse chronological order. Additonally, any severity override or restore action for the finding is recorded here.
Filtering by sources and sinks
Using the filter by sources/sinks feature available in the Data Flow tab or panel (see Expanded details below), you can triage vulnerabilities faster and determine which findings your code fixes would affect.
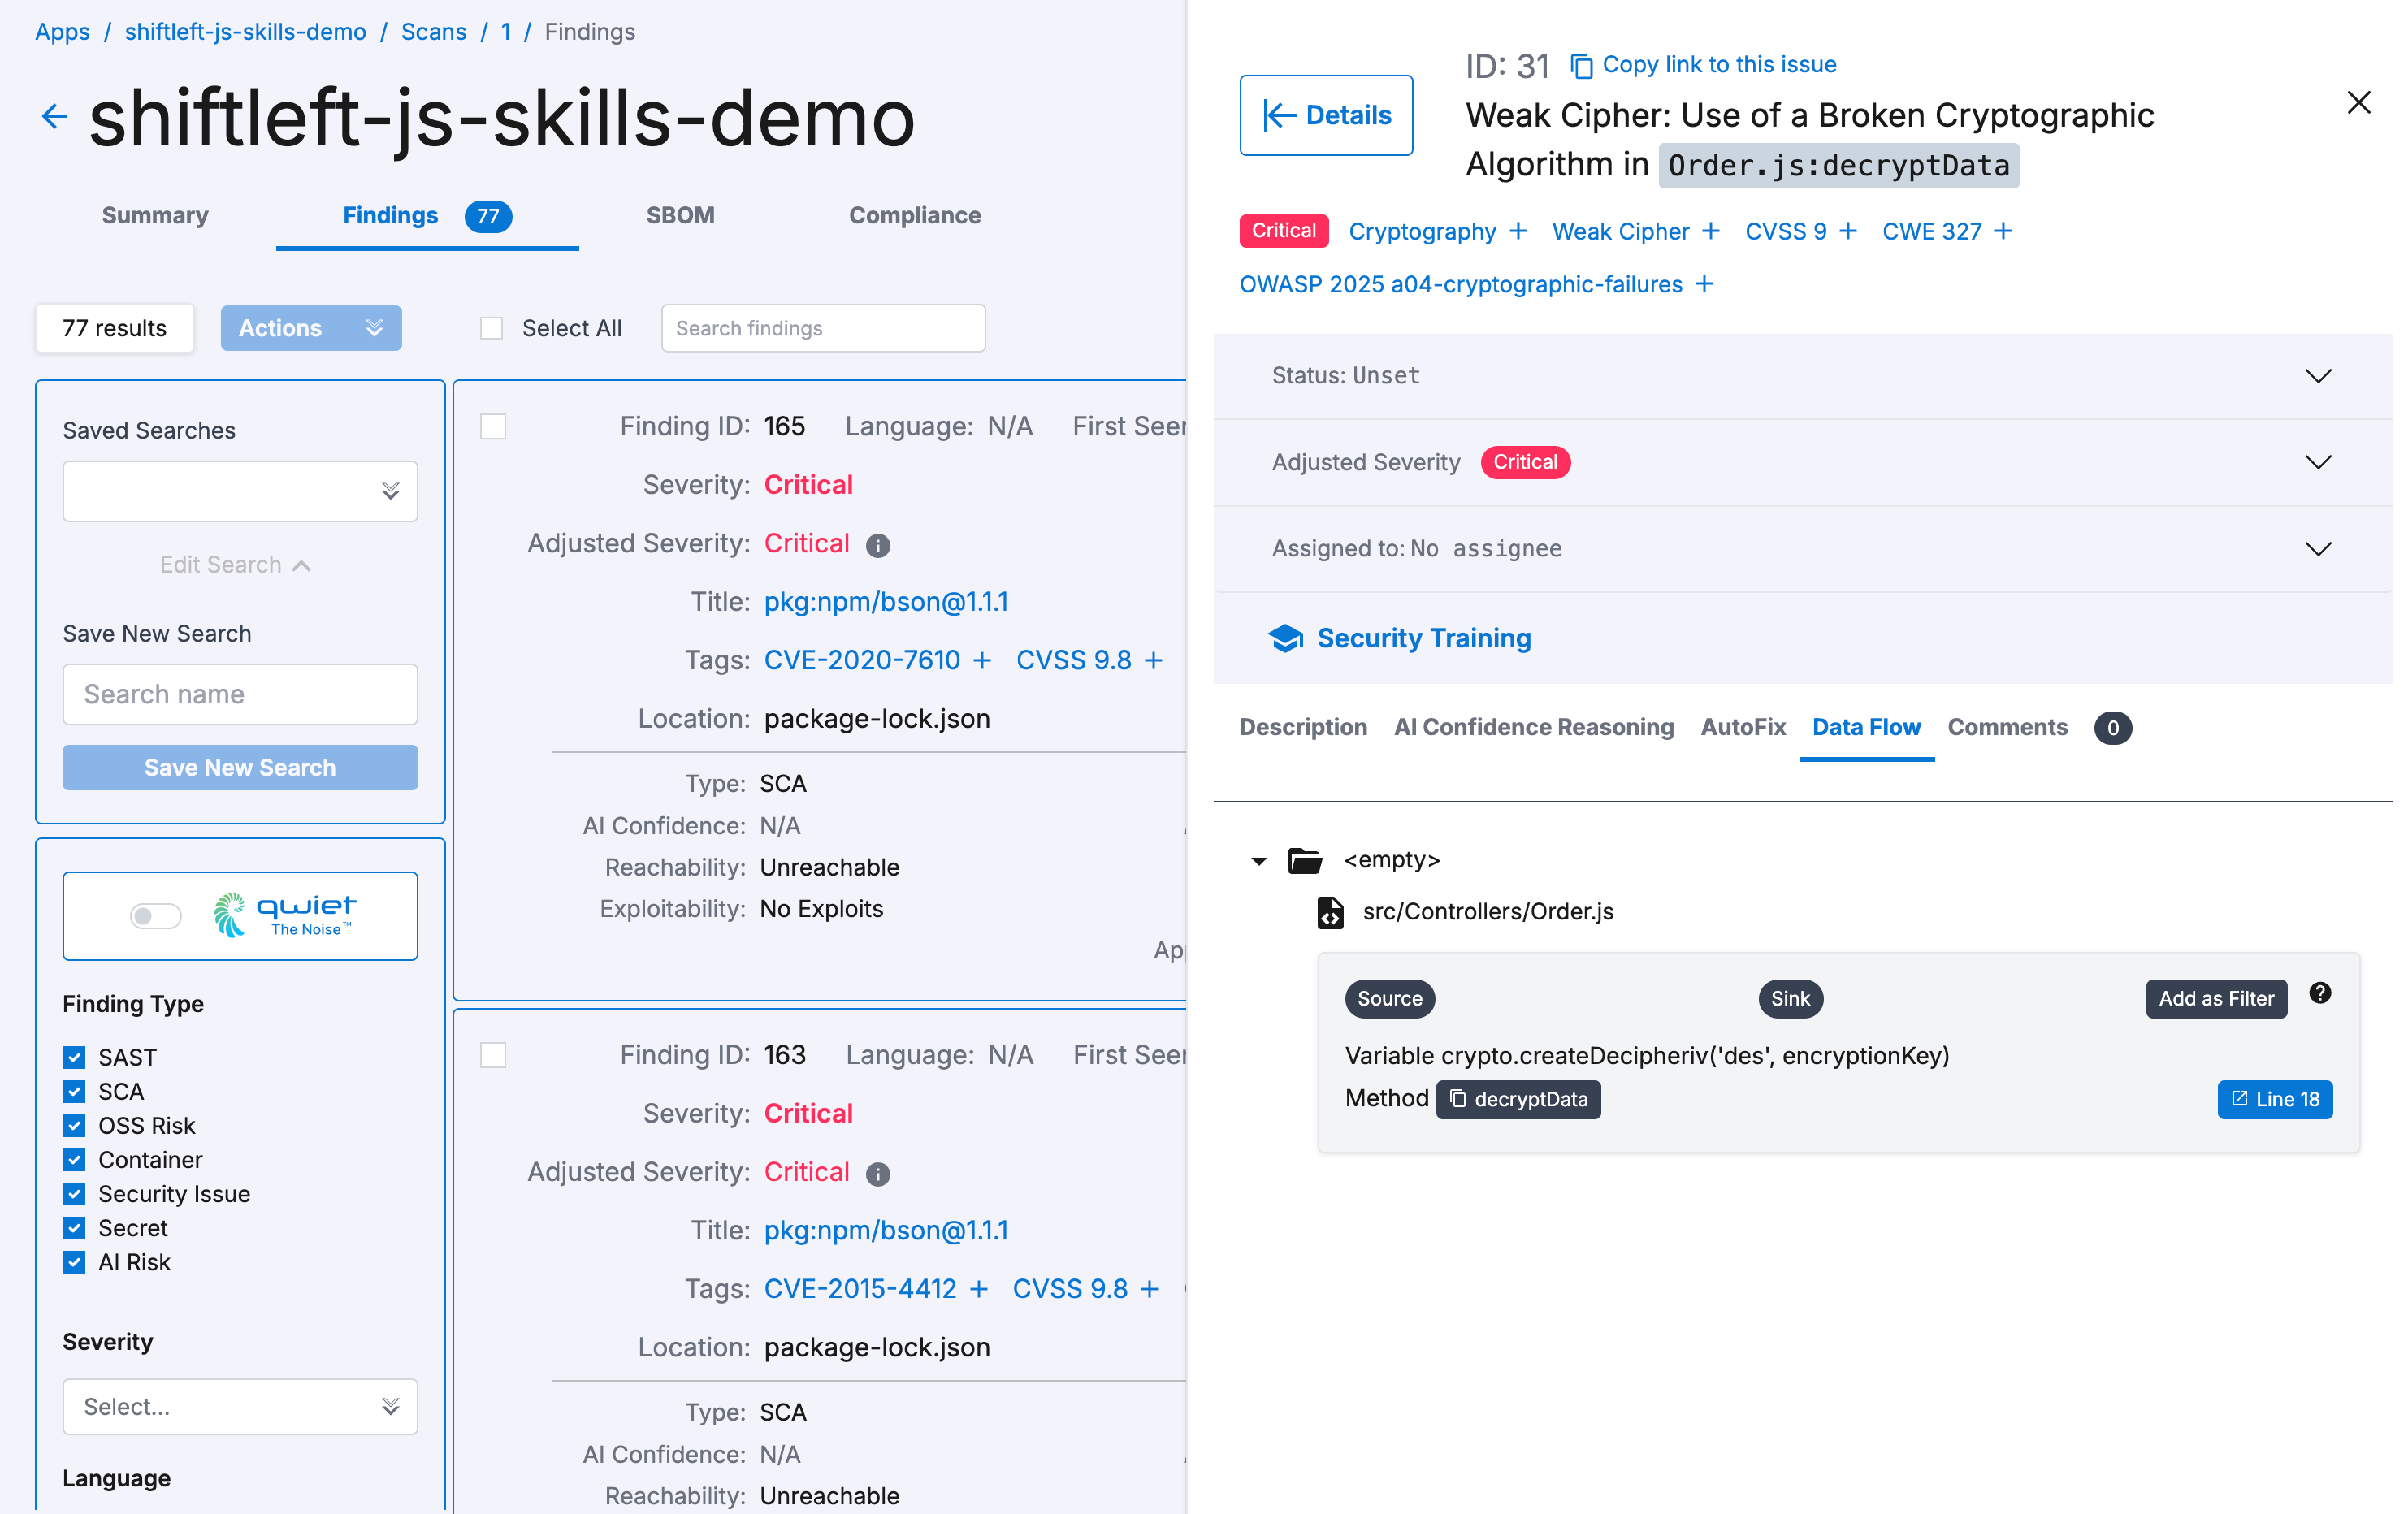
For each source/sink identified by Qwiet AI by Harness, you'll see an option to Add as Filter.
When set, you'll notice that the vulnerabilities list updates to only include vulnerabilities that feature that same source/sink. If you were to patch that specific code portion, these would be the vulnerabilities affected by your code change.
Understanding Reachability tab
The Reachability tab displays evidence that the vulnerable library function identified by an SCA finding can be called, reached, or fed attacker-controlled data from your application's code. Qwiet AI by Harness organizes this evidence into three independent categories so you can identify how that finding matters to your application.
This tab is available for SCA findings in Java, C#, and Kotlin applications only.
The absence of any single kind of evidence does not mean the vulnerable function cannot be reached. It means that Qwiet AI by Harness did not find an example proving it that way for the corresponding call.
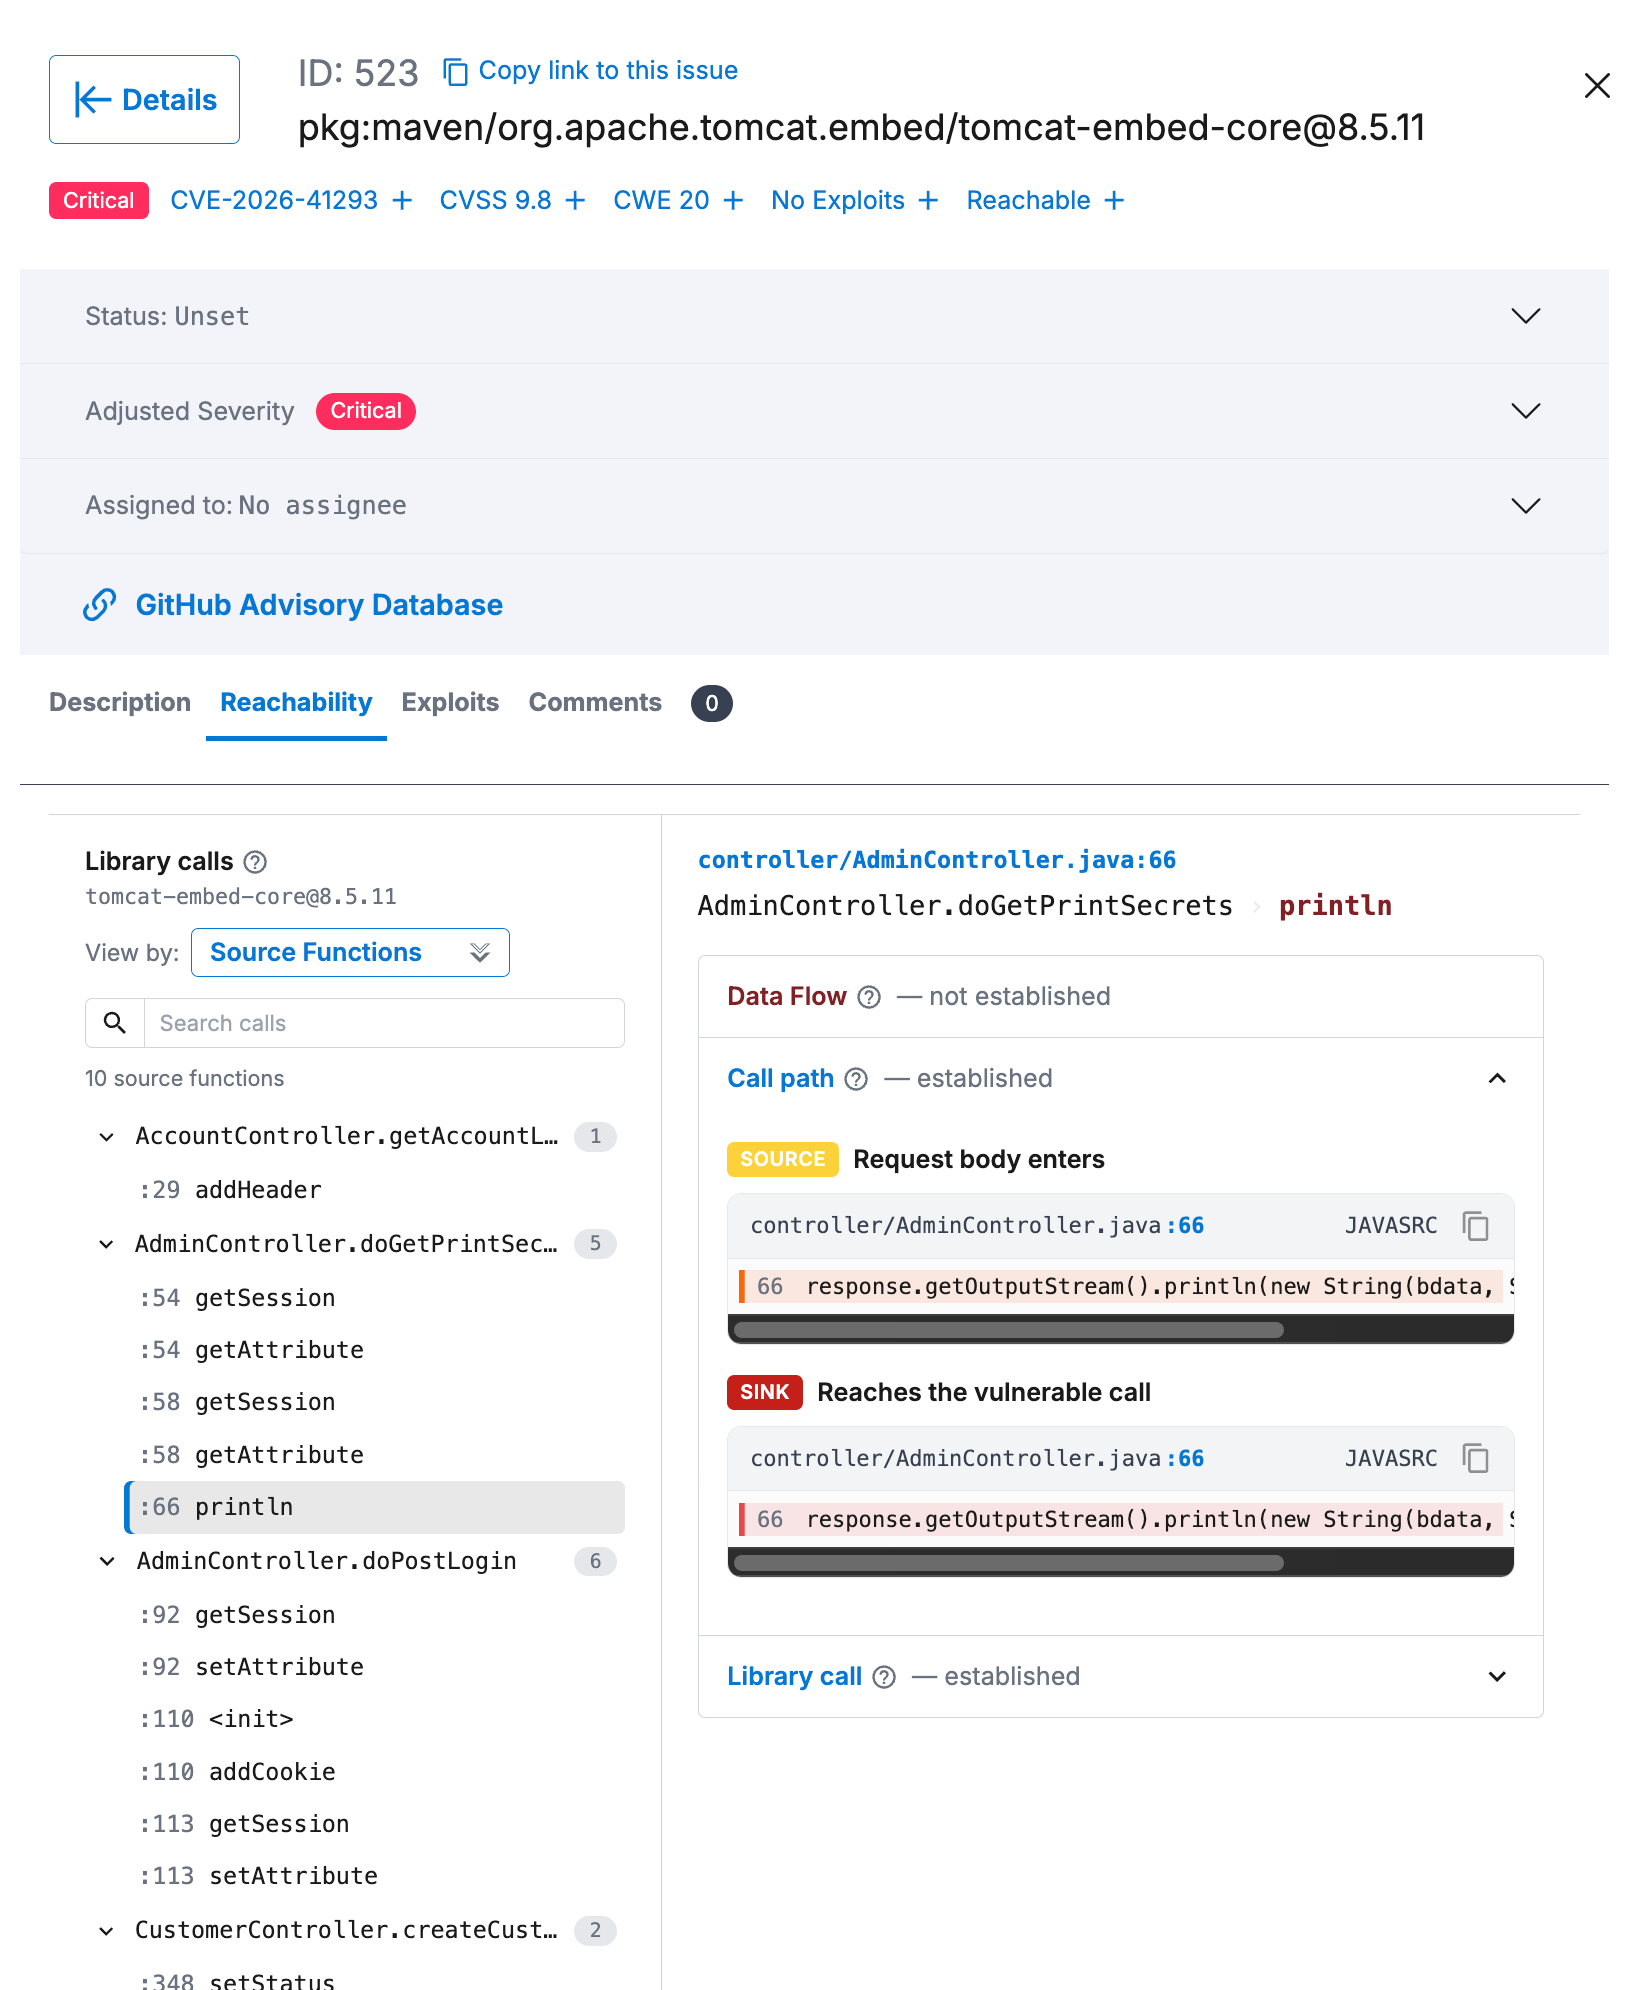
The Reachability tab displays the following information for each finding:
Library calls panel
The Library calls panel on the left of the tab lists every call between your code and the vulnerable library. Use the View by drop-down above the list to select how you wish to organize the calls:
- Source Functions: Groups calls by function in your own codebase that makes the call, so you can see where in your code the library is used.
- Library Sinks: Groups calls by the vulnerable function inside the library being called, so you can see what parts of the library are actually in use.
Select any call in the list to see its reachability evidence on the right.
Reachability evidence
For the call you select, Qwiet AI by Harness displays the following kinds of evidence. Each one is labeled established or not established on its own, because each is calculated using a different technique. A call may have one kind of evidence established without the others.
| Evidence Type | Description |
|---|---|
| Data Flow | The path of a tainted-data flow, from the source where the attacker-controlled input enters your code to the sink where it reaches the vulnerable library call. This uses the same source-and-sink concept as the Data Flow tab for SAST findings. |
| Call Path | A synthetic call chain from an entry point in your application, such as an HTTP handler, to the vulnerable library call. This indicates that the vulnerable code is reachable from somewhere an attacker can trigger, even without proof that attacker-controlled data flows into it. |
| Library Call | The exact library function signature and the line in your code where it is called. This indicates whether or not the vulnerable function is called at all. |
For more information, see Intelligent SCA.
Expanded details
Click Details in the top-left corner of the Finding panel to switch to an expanded view of the finding. This allows you to see data side by side and make quick decisions on how to address a finding.
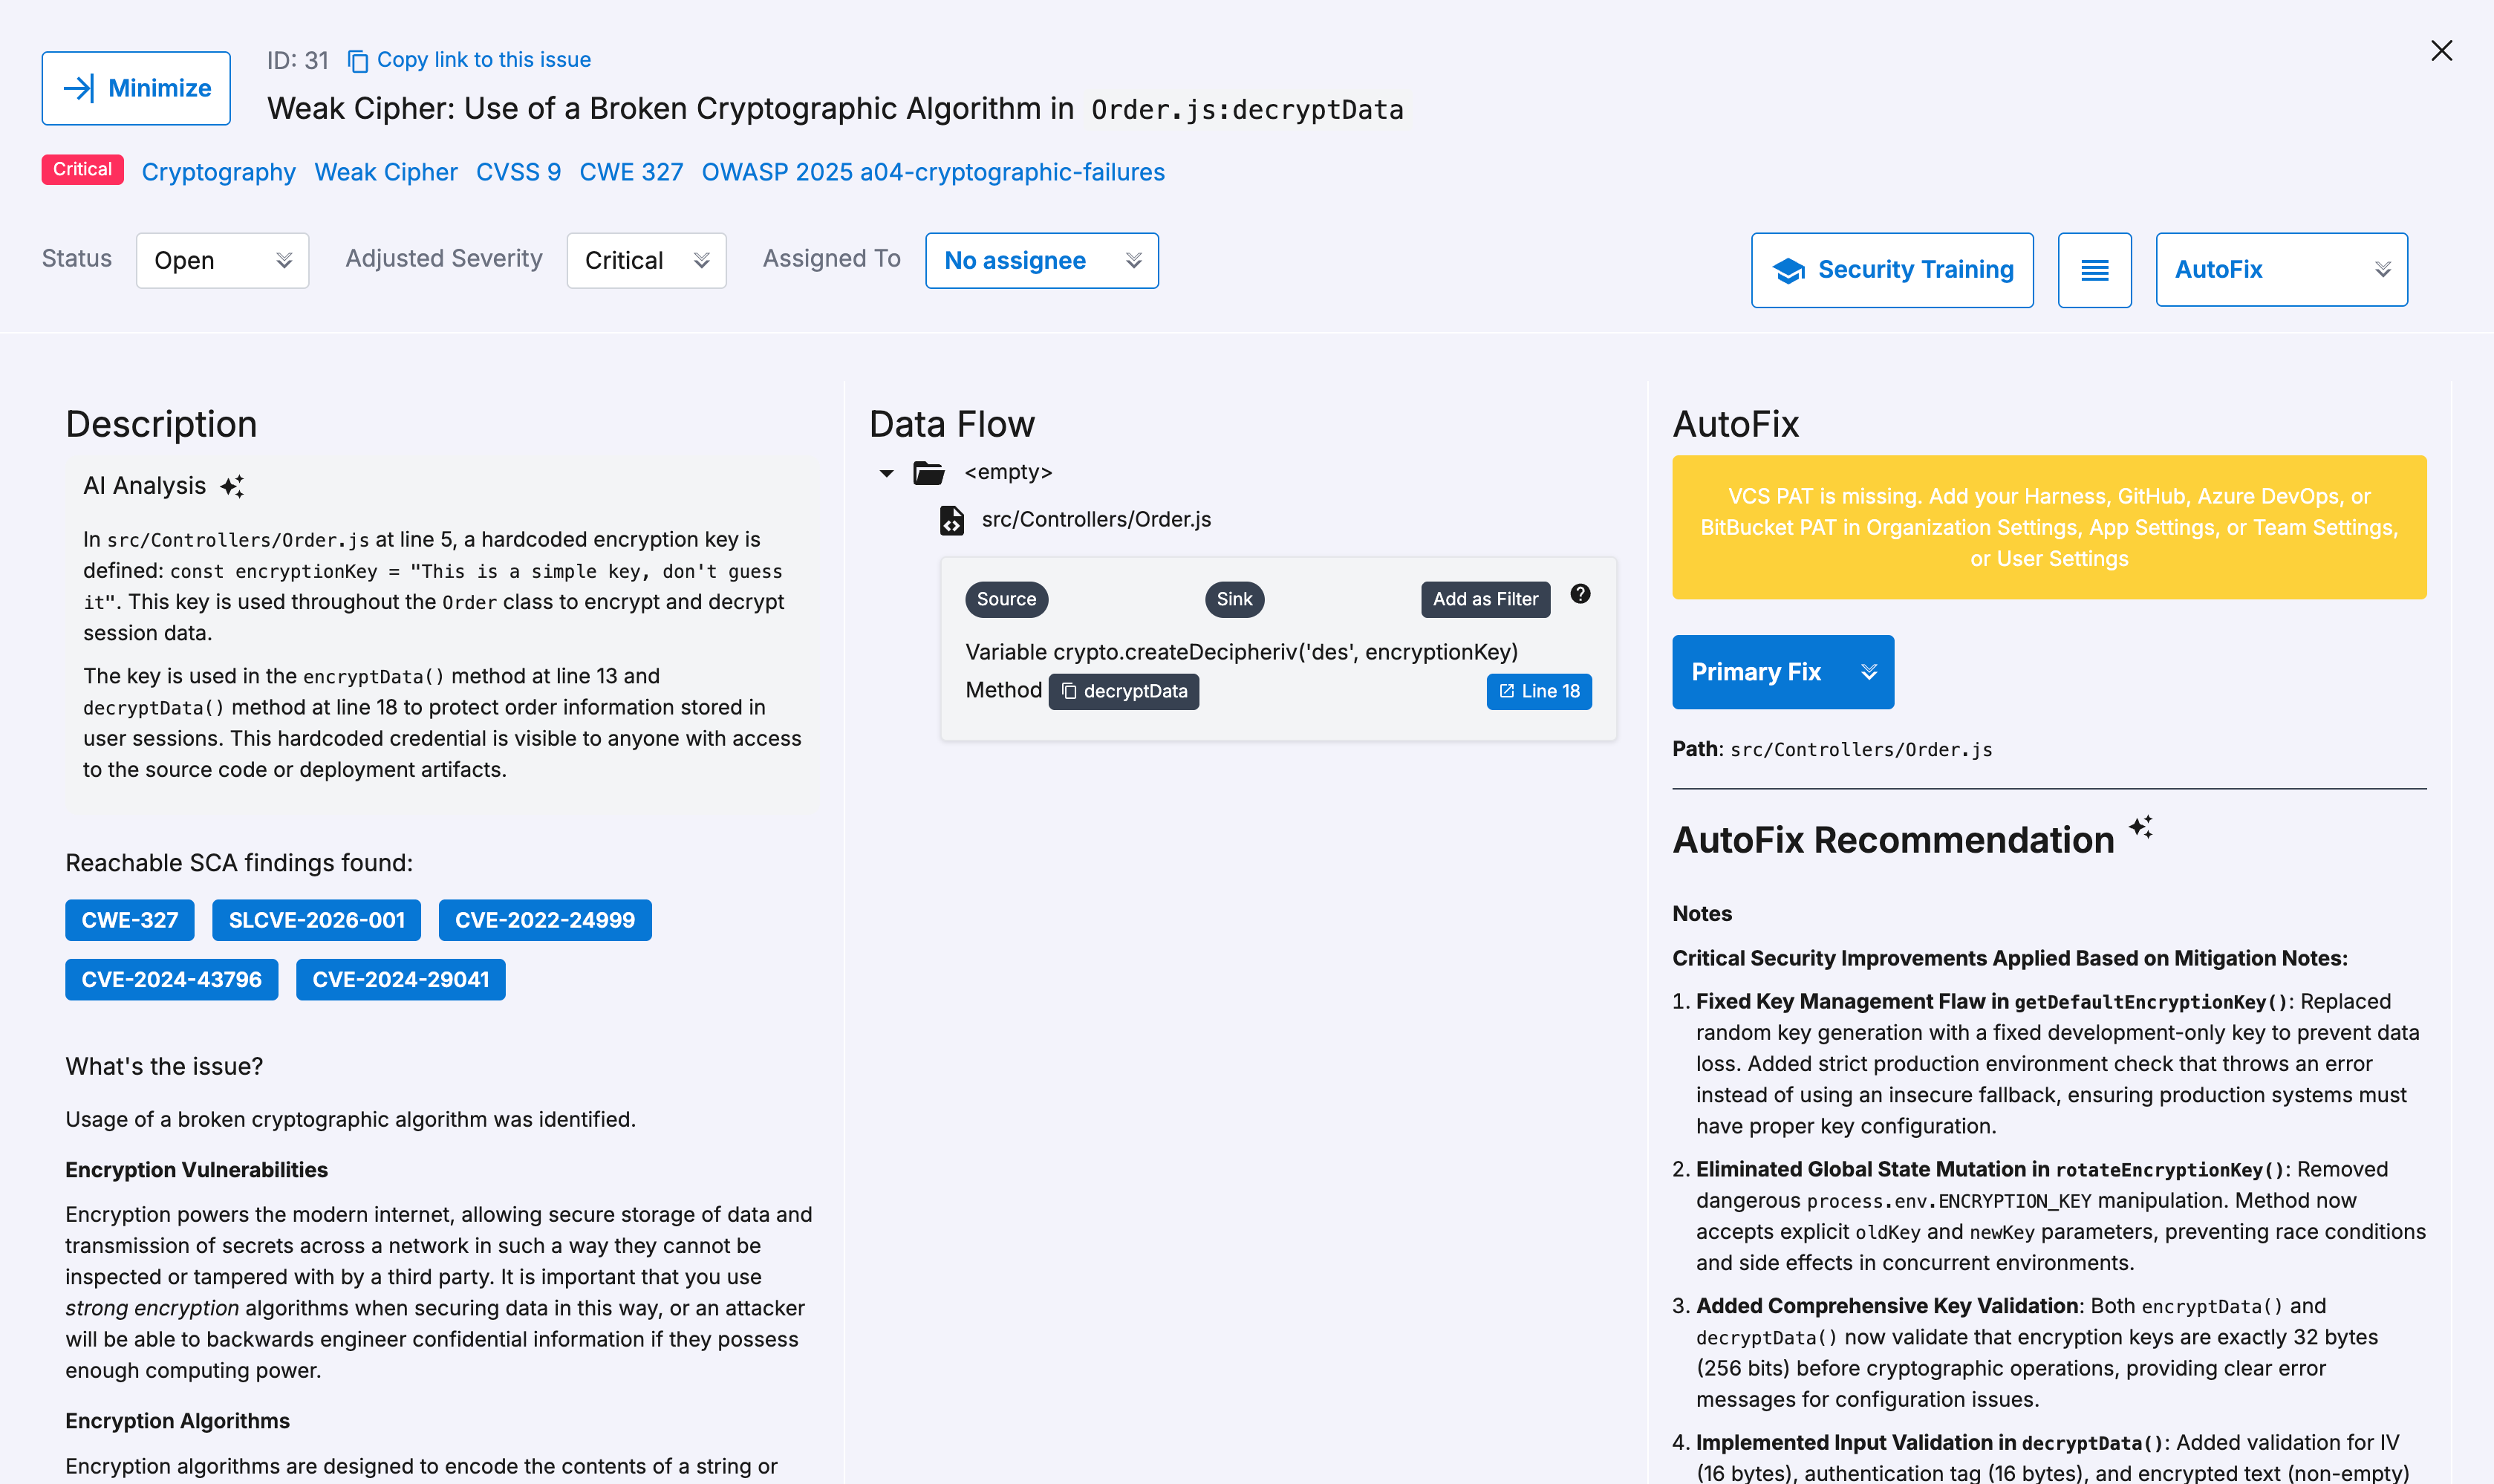
To return to the summary view, click Minimize in the top-left.
Understand a finding's severity
Qwiet AI by Harness shows two severity values for every finding:
| Severity | Description |
|---|---|
| Base Severity | The finding's CVSS severity level. This value is fixed at analysis time and stays the same regardless of which application the finding appears in. |
| Adjusted Severity | The finding's severity for this specific application. Qwiet AI by Harness calculates this value from the Base Severity, the application's risk context, and exploitability signals it already tracks for the finding. You can also set this value directly with a manual override. |
Understand adjusted severity calculation
Qwiet AI by Harness calculates Adjusted Severity by starting from the finding's Base Severity and layering on two additional inputs:
-
Risk context: The application's Deployment Environment, Network Exposure, and Business Criticality, set on the application's Settings tab. For information on setting this up, see Settings.
noteYou can set the three risk context attributes according to your requirements. Qwiet AI by Harness factors in whichever attributes are configured, and falls back to the Base Severity if none are set.
-
Exploitability signals: Additional signals Qwiet AI by Harness already tracks for the finding, such as how easily it could be exploited, and for open-source findings, whether it's reachable in your code.
Qwiet AI by Harness recalculates Adjusted Severity on the next scan or re-evaluation whenever the application's risk context changes. If a finding has a manual severity override in place, Qwiet AI by Harness skips it during recalculation until the override is restored.
Override a finding's severity
If a finding's calculated severity does not reflect your organization's risk considerations, you can manually override it. An override applies to that single finding; it does not change the severity of other findings in the same vulnerability category.
To override severity, you must have the findings:update permissions or the Super Admin, Power User, Team Member, or Team Manager role on the application. For more information, see Roles-based access control.
Set a manual severity override
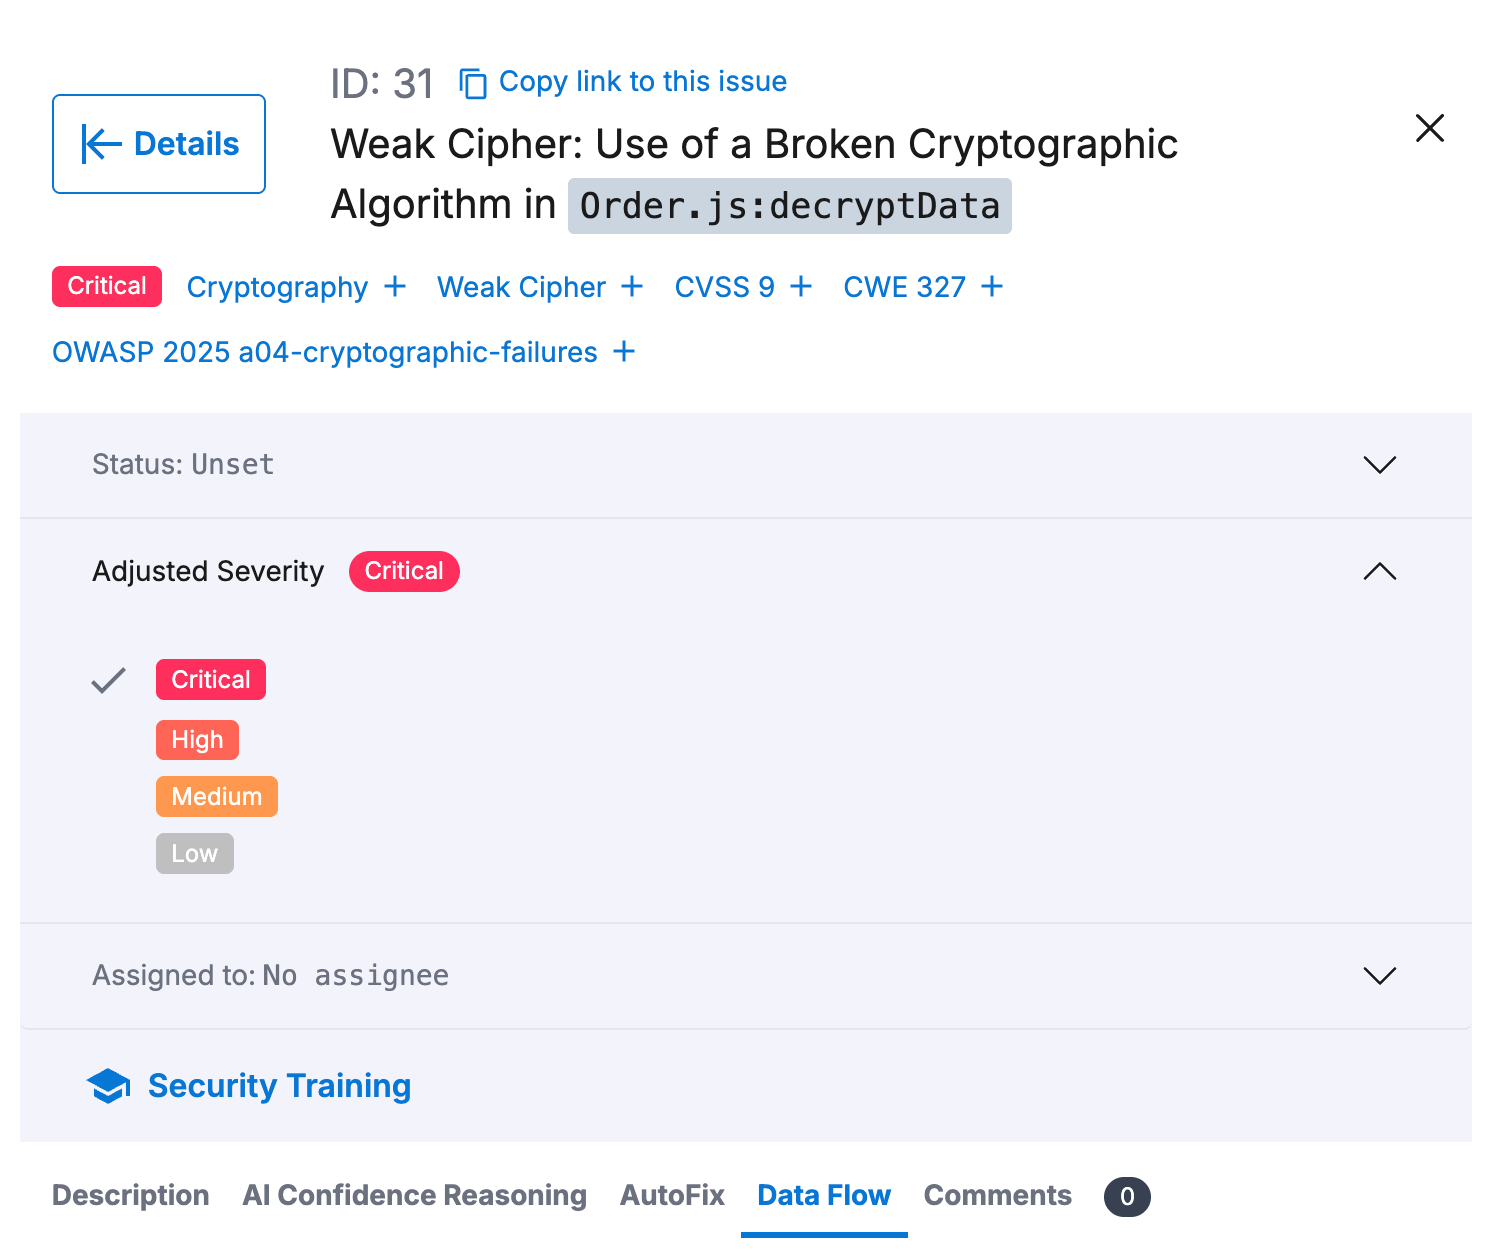
To manually override the adjusted severity, complete the following steps:
-
Open the finding's detail panel and locate the Adjusted Severity drop-down.
-
Select the severity level you wish to apply.
-
In the pop-up window, specify the Reason for changing the severity.
-
Click Save.
Once saved, Qwiet AI by Harness does the following:
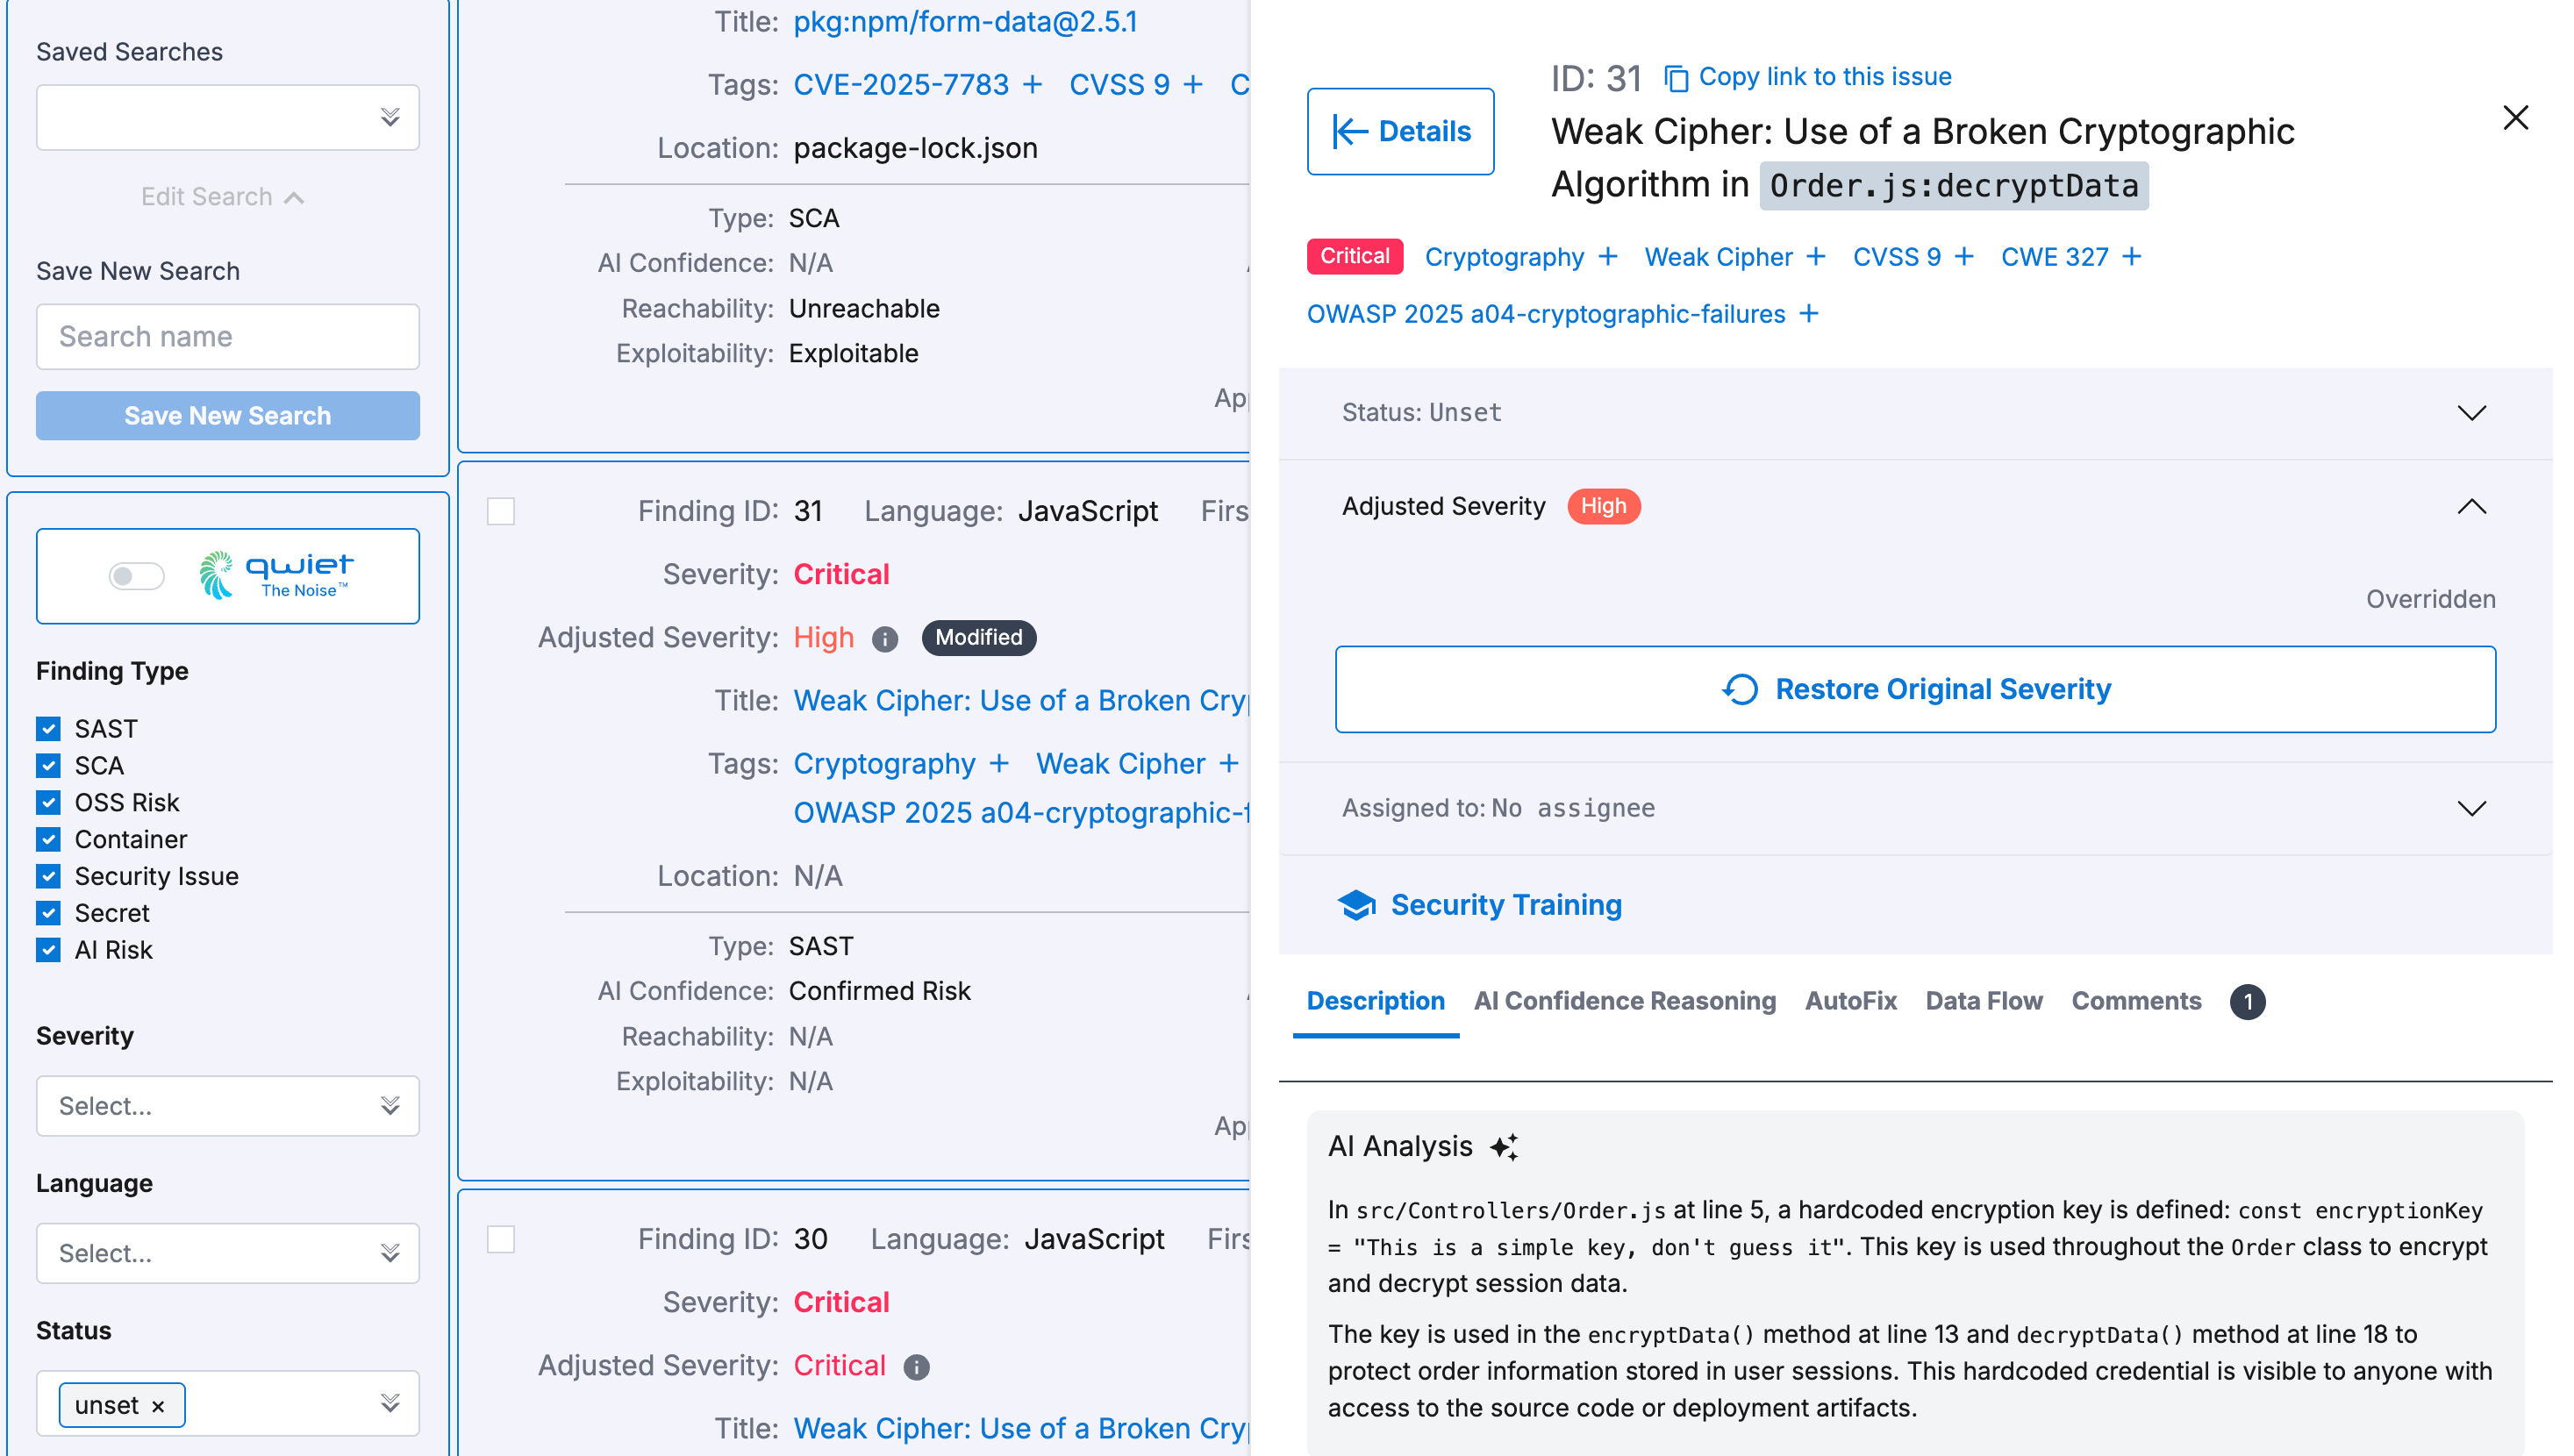
- A Modified indicator appears on the finding in its list view, which means that the severity has been manually modified.
- Disables the Adjusted Severity drop-down, which means that you can not select a different value directly. To change the severity again, click Restore Original Severity, then apply a new override.
- An indicator appears in the finding's detailed view, showing Overridden, which means that the severity has been manually modified.
- An entry is added to the finding's Comments tab showing the original severity, the updated severity, the timestamp of the change, the user who made the change, and your justification comment.
The overriden severity persists across future scans of the application, and takes precedence over recalculation: if the application's risk context changes, Qwiet AI by Harness does not recalculate Adjusted Severity for a finding that currently has a manual override in place.
You can also view, override, and restore adjusted severity from the CLI. See sl finding severity.
Changing status
Set the finding status to reflect work that's been done (e.g., set the finding status to Fixed if you've mitigated the issue):
- Open: The default status value for a finding
- Fixed: Mark the finding as fixed if you've applied remediation of some type (note that setting this status does not fix the finding) so that Qwiet doesn't include the finding in the scan results
- Ignored: Mark the finding as ignored so it doesn't show up in scan results again. Used to indicate that something is a false positive or is unlikely to impact the application's security. If you set the status to ignored, you must also provide a comment that includes information on your reasoning for choosing this status
- 3rd Party: Mark the finding as 3rd Party to indicate that the finding is in a third-party library; you can't fix the finding at the moment, but you should return to it at a later date
Additional actions
You can also perform the following actions:
- Assign to a team member the vulnerability for further research and work
- Get a link to issue that's specific to this finding that you can share with others
- Launch Security Training that's specific to this type of finding (if available and applicable)
- Click the Send to Jira button (if the Jira integration is enabled) to create a Jira issue with the finding details